前回の記事「人工知能に表情を学習させて、無表情の写真から笑顔の写真を作ってみた。」で使用したディープラーニングのプログラミングコードを公開してほしいというリクエストいただいたので、プログラミングコードを公開・解説したいと思います!
まずは、必要なライブラリをインポートします。
今回は機械学習用のライブラリ「Chainer」を利用します。
「matplotlib」は必要ないですが、最後にテスト結果の画像をプロットするために入れました。
import os
import cv2
import numpy as np
import chainer.links as L
import chainer.functions as F
from chainer import Chain, optimizers, Variable
import matplotlib.pyplot as plt
import cv2
import numpy as np
import chainer.links as L
import chainer.functions as F
from chainer import Chain, optimizers, Variable
import matplotlib.pyplot as plt
続いて、学習とテスト使用する入力データとラベルを用意します。
Chainerを利用する場合、データはfloat32型に固定する必要があります。
最後に255で割っているのは正規化をしています。
train_files = os.listdir(“./facial-expression/train/”)
train_label = os.listdir(“./facial-expression/train/label/”)x_train_data = []t_train_data = []x_test_data = []for image in train_files:
if image.endswith(“.jpg”):
image = cv2.imread(“./facial-expression/train/” + image)
image = cv2.cvtColor(image, cv2.COLOR_BGR2GRAY)
image_gs = image.flatten()
x_train_data.append(image_gs)for image in train_label:
if image.endswith(“.jpg”):
image = cv2.imread(“./facial-expression/train/label/” + image)
image = cv2.cvtColor(image, cv2.COLOR_BGR2GRAY)
image_gs = image.flatten()
t_train_data.append(image_gs)image = cv2.imread(“./facial-expression/test_data.jpg”)
image = cv2.cvtColor(image, cv2.COLOR_BGR2GRAY)
image_gs = image.flatten()
x_test_data.append(image_gs)x_train = np.array(x_train_data, dtype=np.float32)
x_test = np.array(x_test_data, dtype=np.float32)
t_train = np.array(t_train_data, dtype=np.float32)
x_train /= 255
x_test /= 255
t_train /= 255
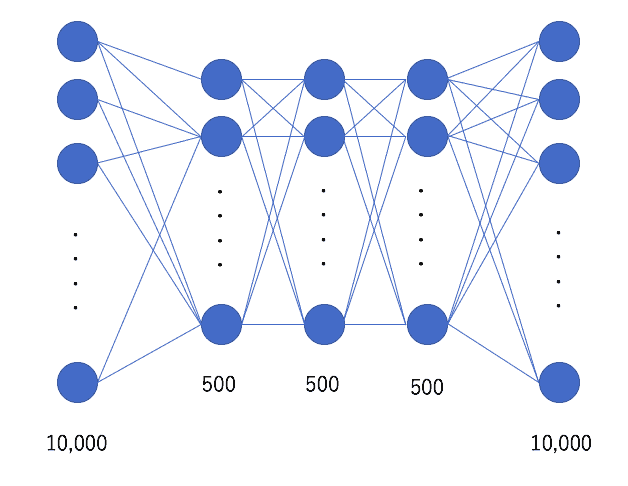
続いてニューラルネットワークモデルのクラスです。
こちらのモデルは隠れ層が3層で、各隠れ層のノード数が500になります。
入力と出力は、画像のサイズが100px*100px且つグレースケールなので、10,000になります。
class NN(Chain):
def __init__(self):
super(NN, self).__init__(
l1 = L.Linear(10000, 500),
l2 = L.Linear(500, 500),
l3 = L.Linear(500, 10000)
)
def forward(self, x):
h = F.relu(self.l1(x))
h = F.relu(self.l2(h))
h = self.l3(h)
return hmodel = NN()
def __init__(self):
super(NN, self).__init__(
l1 = L.Linear(10000, 500),
l2 = L.Linear(500, 500),
l3 = L.Linear(500, 10000)
)
def forward(self, x):
h = F.relu(self.l1(x))
h = F.relu(self.l2(h))
h = self.l3(h)
return hmodel = NN()
CNNにすると以下のようになります。
x_train = x_train.reshape((len(x_train), 1, 100, 100))
x_test = x_test.reshape((len(x_test), 1, 100, 100))class CNN(Chain):
def __init__(self):
super(CNN, self).__init__(
conv1 = L.Convolution2D(in_channels=1, out_channels=20, ksize=5, stride=1, pad=2),
conv2 = L.Convolution2D(in_channels=20, out_channels=50, ksize=5, stride=1, pad=2),
l1 = L.Linear(None, 500),
l2 = L.Linear(500, 500),
l3 = L.Linear(500, 10000)
)
def forward(self, x):
h = F.max_pooling_2d(F.relu(self.conv1(x)), 2)
h = F.max_pooling_2d(F.relu(self.conv2(h)), 2)
h = F.relu(self.l1(h))
h = F.relu(self.l2(h))
h = self.l3(h)
return hmodel = CNN()
最適化手法とエポック数を設定します。
optimizer = optimizers.Adam()
optimizer.setup(model)
n_epoch = 1000
optimizer.setup(model)
n_epoch = 1000
学習を実行します。
for i in range(n_epoch):
x = Variable(x_train)
t = Variable(t_train)
y = model.forward(x)
model.cleargrads()
loss = F.mean_squared_error(y, t)
loss.backward()
optimizer.update()
print(“epoch: {0}, mean loss: {1}”.format(i,loss.data))
x = Variable(x_train)
t = Variable(t_train)
y = model.forward(x)
model.cleargrads()
loss = F.mean_squared_error(y, t)
loss.backward()
optimizer.update()
print(“epoch: {0}, mean loss: {1}”.format(i,loss.data))
学習結果をもとにテストを実行し、テスト結果の画像をプロット、保存します。
t_result=[]for i in range(len(x_test)):
x = Variable(np.array([x_test[i]], dtype=np.float32))
y = model.forward(x)
t_result.append(y.data)
t_result = np.array(t_result, dtype=np.float32)
t_result = t_result.flatten()
t_result *= 255
t_result = t_result.reshape(100, 100)plt.imshow(t_result)
plt.gray()
plt.show()cv2.imwrite(“face.jpg”, t_result)
以上です!

最新情報をチェックしよう!